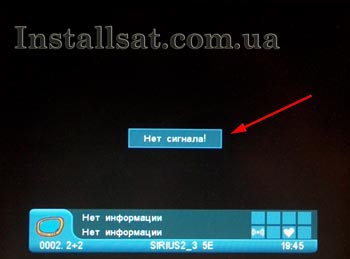
Consideremos cómo conectar correctamente su receptor a una antena parabólica sin la ayuda de especialistas, si por alguna razón la configuración del sintonizador se interrumpió (compró un nuevo sintonizador; "firmware" se fue; "tocó" donde no debía; "ayudó" a los niños, etc.) y en lugar de transmitir su canal favorito, vemos una inscripción terriblemente desagradable "sin señal".
Hay 2 formas de resolver este problema usted mismo.
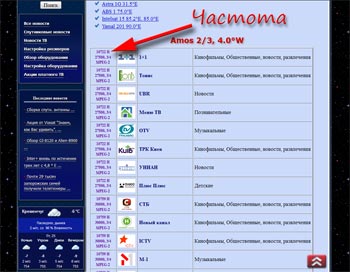
En primer lugar, debe determinar a qué satélites están sintonizadas las antenas. Esto no será difícil si recuerda qué canales estaban disponibles anteriormente para usted. Desde la siguiente tabla puede determinar a qué satélites pertenecen estos canales. La mayoría de las veces, se instala una antena en 3 satélites: Amos, Sirius (Astra) y HotBird. A veces, se instala una antena adicional con un cabezal (convertidor) en un satélite adicional. Le recomendamos que anote la lista de satélites recibidos en una "columna" y frente a cada satélite, cualquier frecuencia de este "satélite", en la que se "sientan" una gran cantidad de canales.
Si hay fácil acceso a la antena parabólica:
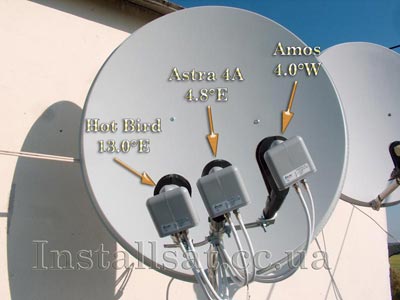
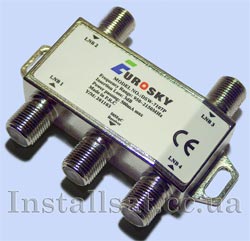
La imagen muestra a qué satélite está sintonizado un cabezal en particular. Un cable (o varios cables) sale de cada cabezal, conectándolo a un conmutador Diseqc especial (generalmente ubicado detrás de la antena). Todas las entradas del conmutador están numeradas (lnb 1, lnb 2, lnb 3, etc.). Habiendo determinado de qué cabezal, a qué entrada del conmutador Diseqc está conectado el cable, puede determinar a qué satélite corresponde el número en el conmutador. Por lo tanto, marcamos en la lista opuesta a cada satélite definido el número de puerto correspondiente del conmutador Diseqc. Es importante no cometer un error, diferentes satélites no pueden tener el mismo número de puerto.
Habiendo compilado dicha lista, puede proceder a la configuración del receptor. Para ello, siga estos pasos:
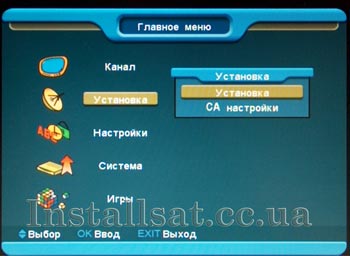
1. Encienda el receptor y busque el elemento configuración de la antena (instalación) en el menú principal. Si no hay tal elemento, en algunos sintonizadores estos ajustes pueden estar ubicados en el elemento "búsqueda de canales". Al ingresar a este elemento del menú, debemos encontrar los parámetros de configuración del satélite (nombre del satélite, tipo de LNB, DiSEqC, polarización, potencia del LNB, escala de nivel y calidad de la señal, etc.). En diferentes receptores, estas leyendas pueden diferir ligeramente.
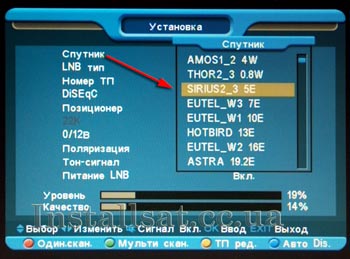
2. Haga clic en el nombre del satélite, se desplegará una lista de satélites integrados. De toda la variedad, elegimos uno de los que necesitamos.
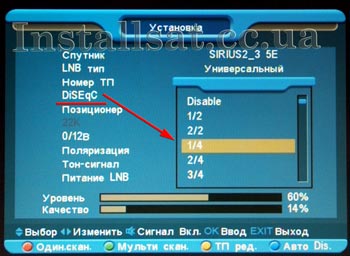
3. Vaya a la pestaña DiSEqC (DiSEqC 1.0), seleccione de la lista desplegable el número correspondiente al satélite seleccionado (por ejemplo: "3", o "LNB 3", o "C", o "3/4" (donde 3 es el número de puerto del conmutador, 4 significa que nuestro conmutador solo tiene 4 puertos)). En algunos receptores, la numeración Diseqc no es digital, sino alfabética, por ejemplo, LNB «A», LNB «B», LNB «C», etc. Por lo tanto, "atamos" otros satélites a sus puertos del conmutador DiSEqC.
4. Al presionar el botón "SALIR" en el control remoto, salga del menú. Cuando se le solicite guardar la configuración, acepte seleccionando la opción de respuesta adecuada y presionando "OK".
Si el acceso a la antena parabólica es difícil:
En este caso, también es posible resolver el problema, pero ya por el método "poke".
Del método anterior, realizamos los pasos 1 y 2.
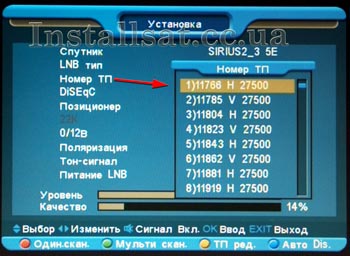
Luego, vaya a la pestaña "Número de TP" ("Frecuencia", "Transpondedor"): se desplegará una lista de frecuencias de este satélite. Seleccione la frecuencia de operación de nuestra lista previamente compilada, presione "OK" en el control remoto.

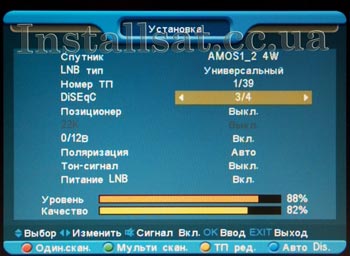
Vaya a la pestaña DiSEqC (DiSEqC 1.0), seleccione un número aleatorio de la lista desplegable (por ejemplo: "3", o "LNB 3", o "C", o "3/4" (donde 3 es el número de puerto del conmutador, 4 significa que nuestro conmutador solo tiene 4 puertos)). Presione "OK" para fijar el valor y observe la escala de calidad de la señal. Si el indicador en la escala ha aumentado significativamente, entonces el satélite seleccionado corresponde al número del conmutador verificado. Si no, intente el siguiente número DiSEqC de la misma manera hasta que la escala de calidad aumente. Si el resultado es positivo, deje este valor y vuelva a la selección del siguiente satélite. Luego, seleccione el número de puerto DiSEqC por analogía con el satélite anterior.
Luego, queda realizar el paso 4 del método anterior.
Si todo se hace sin errores y los canales aún no quieren mostrarse, lo más probable es que haya problemas con la señal que llega al receptor. En este caso, debe llamar a un especialista para un diagnóstico y solución de problemas adecuados.

